How To Keep Your Yoga Mat Clean

yoga-mats-cleaning.png

Between minding your breath, balancing in tree pose, and avoiding a face plant during crow pose, a yoga practice gives you plenty to think about. So it’s easy to overlook the care and upkeep of your mat. 

Still, reasons to keep your yoga mat clean abound (even if you aren’t a germaphobe). A clean mat is safer and healthier for anyone who uses it. 

No matter whether you own a mat or share mats at a studio or gym, read on to learn why it’s important to clean a yoga mat, and discover tips and tricks to do it right. We’ll also cover some of the signs that indicate you should replace your mat. 

Why It’s Important to Clean Yoga Mats

It’s not pleasant to think about, but your skin swarms with all sorts of creepy crawlies in the form of bacteria, fungi, viruses, and microscopic mites. These microorganisms move from your hands to your yoga mat during your practice. And the same thing goes for the oils, sweat, and tens of thousands of skin cells your body sheds every day.

That’s not all: If left unchecked, living organisms such as bacteria, fungi, and viruses multiply. And because these microorganisms thrive in humid environments, they’re likely to reproduce in a hot yoga studio or on a sweaty mat. 

For the most part, even a large amount of bacteria, fungi, and viruses likely won’t cause harm. But for people with broken skin or compromised immune systems, exposure to microorganisms could result in a skin infection, athlete’s foot, plantar warts, or ringworm. 

Now that you know how dirty human bodies can be, we probably don’t need to spell out why it’s important to clean a yoga mat. But here goes: Washing your mat on a regular basis helps limit the buildup of germs and other substances. And the same thing goes for cleaning a shared mat at a yoga studio or gym — only in this case, you’ll protect yourself from other people’s microorganisms and protect other people from yours. 

How to Clean a Yoga Mat

Now that you know how dirty your yoga mat is, here’s how to clean it right. 

1. Check the mat’s website for instructions. 

Different mats are made up of different materials. Check the website for your brand of yoga mat to see if they have specific instructions regarding how to clean your mat. Follow the manufacturer’s tips if you find them. 

2. Wipe down your mat after every practice.

After every class or practice session, wipe down your mat. An antibacterial hand wipe or antibacterial spray will work in a pinch. But in a recent study, researchers discovered that the widespread use of antibacterial sanitisers in gyms and yoga studios may be unintentionally contributing to an explosion of antibiotic-resistant bacteria. To stay safer over the long-term, you may be better off using a 50-50 vinegar and water spray and a clean towel instead of antibacterial options. (If this option isn’t available at your gym or studio, consider requesting it.) Make sure any cleaner you use is safe for porous surfaces and human skin. Let the mat completely dry before you roll it up. 

3. Deep clean your mat regularly. 

If you own a mat, it’s best to deep clean it occasionally. If you practice nearly every day, plan to wash your mat thoroughly at least once a month using one of these strategies.

  • Hose it down

If the weather allows, head outside with a mild detergent, a sponge, and a hose. Spray down your mat, scrub it with detergent, rinse it thoroughly, and let it air dry out of direct sunlight. (Direct sun exposure can cause foam to break down.) Dry the mat completely before you roll it back up for storage. 

  • Soak it

If your home has a bathtub, you can deep clean your mat indoors. Fill the tub with lukewarm water, get the mat wet, and scrub it. If it’s been a long time since your last cleaning, let it soak for a while. Finally, rinse the mat and hang it until it’s completely dry.
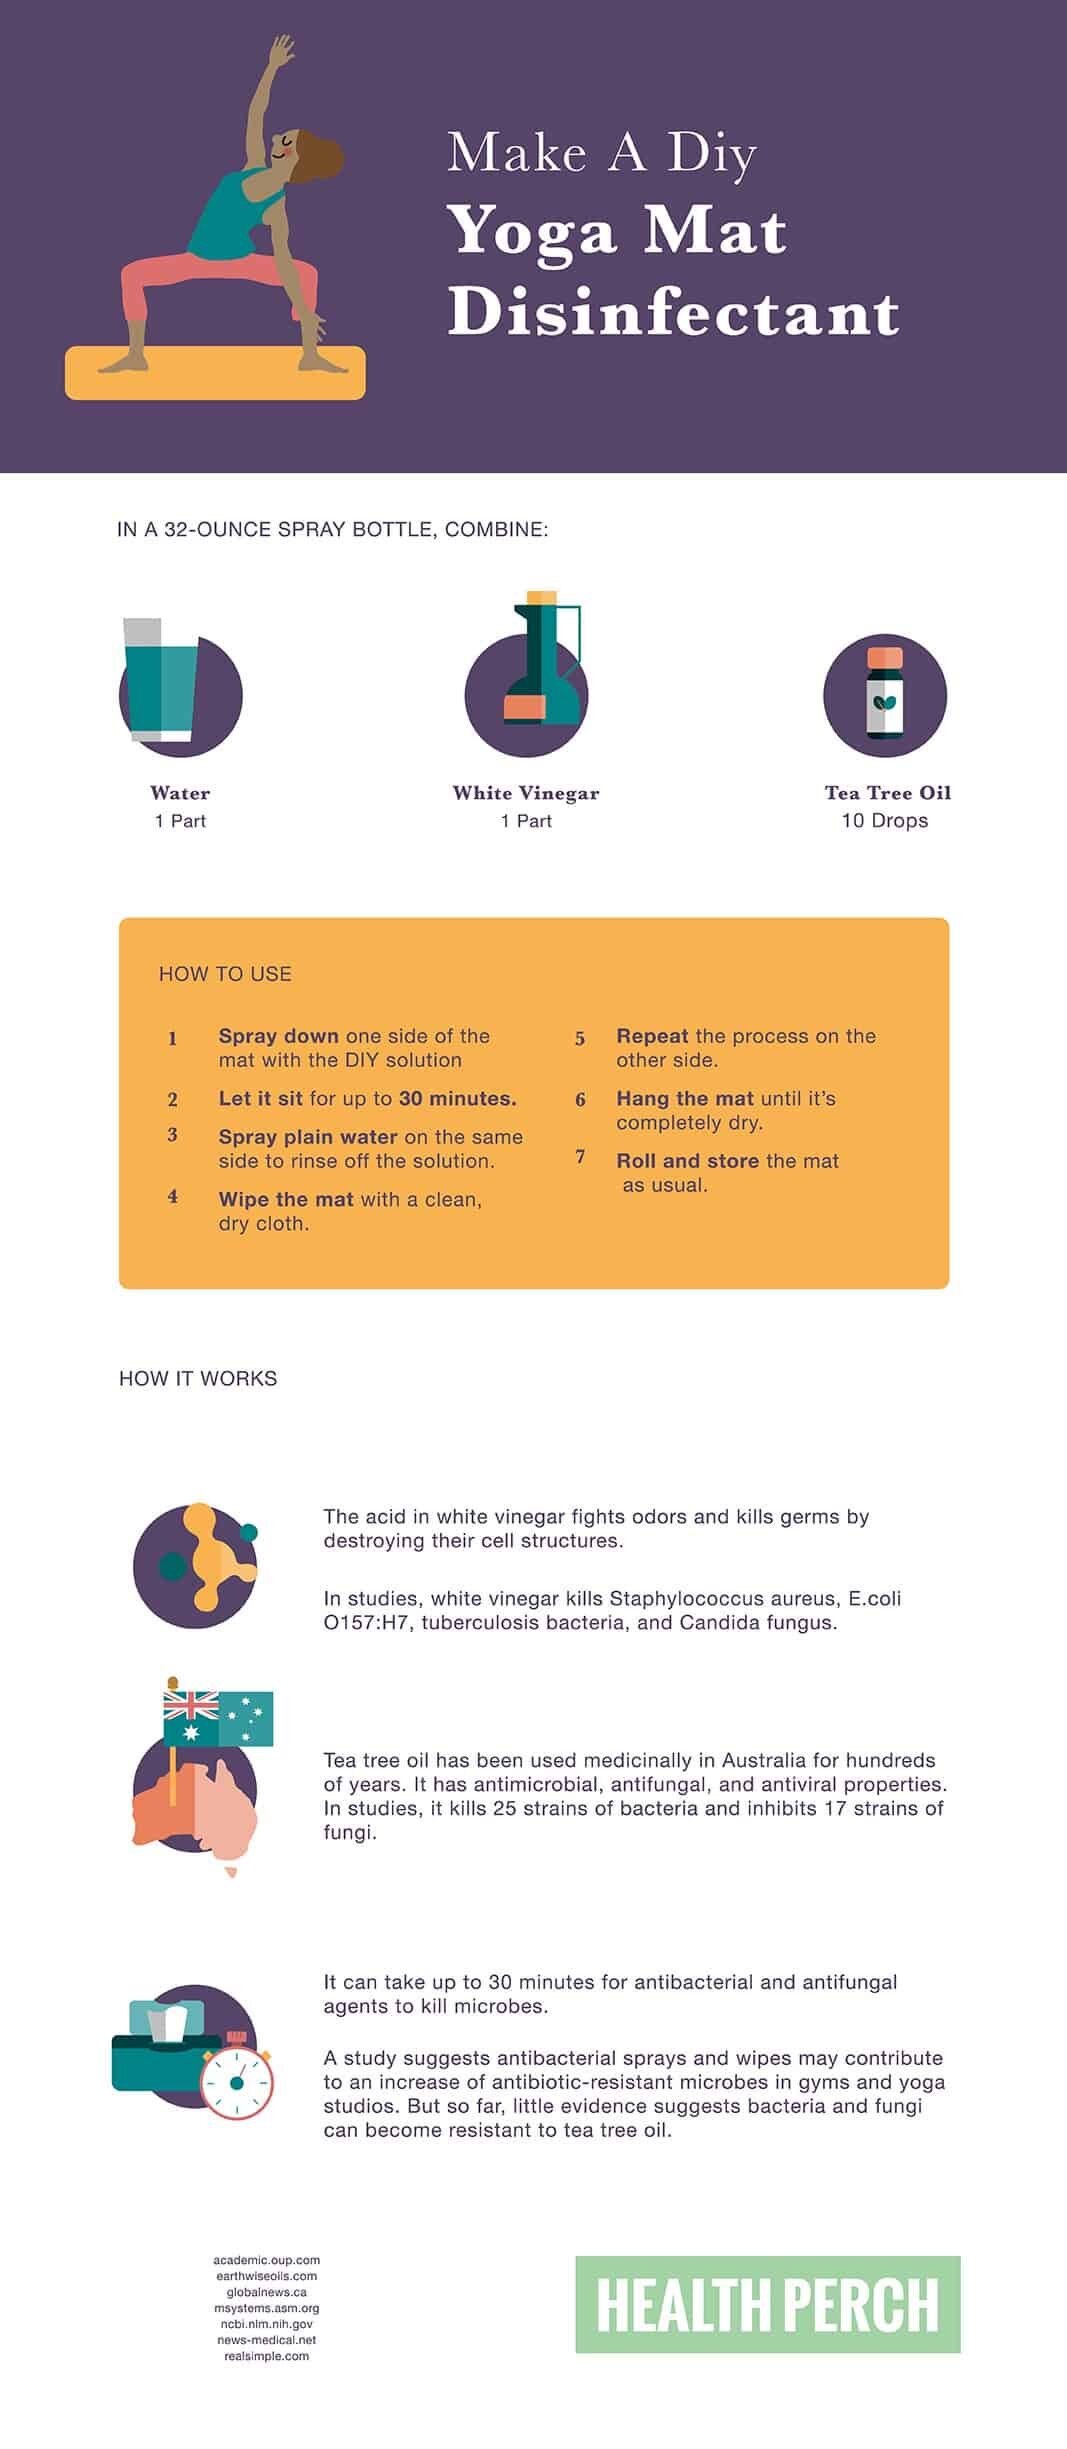
  • Use a cleaning solution

You can purchase a cleaning product that’s designed for deep cleaning yoga mats or make your own with vinegar, water, and tea tree oil. No matter which solution you use, liberally spray down one side of the mat with it, let it sit for a while, rinse the solution off, and dry it with a clean, dry cloth. Repeat the process on the other side and hang the mat to dry. 


how-to-keep-your-yoga-mat-clean_001.jpg

Signs It’s Time to Replace Your Old Yoga Mat 

Even if you take great care of your yoga mat, it won’t last forever. At a certain point, you’ll need to invest in a new mat. Depending on the materials and construction of your mat, the time frame can vary. Here are some signs it may be time to replace your old mat. 

  • Your mat has permanent indents

Take a close look at the surface of your mat. Does it have squished or sagging sections where you regularly place your hands or feet? If so, it may be time for a new mat. Worn areas don’t provide much support, which can be tough on your joints. Plus, indents make balance poses more challenging, which can lead to accidents.

  • Your joints are achy

Do your joints hurt after yoga class when they didn’t in the past? Achy joints may be another sign the cushion on your mat is wearing away. You should feel supported in every pose. If you don’t, it may be time for a new mat. 

  • You’re slipping all over the place

If your mat once did a good job of preventing slips and now feels like a slip-and-slide when you get sweaty, it may be time for a replacement. Slippery mats make accidents more likely. Look for a new mat that offers plenty of traction.

  • Your mat is deteriorating

If your mat has holes in it, leaves bits of foam everywhere, or is going bald, you’ve loved it to the point of retirement. A declining mat isn’t supportive.

  • It’s smelly (even after you clean it)

If your mat has developed a permanent “eau de sweat,” and even a deep clean doesn’t get rid of it, then you (and your classmates) will benefit from a fresher mat. 

Conclusion

Even if it takes a little extra effort after class, it’s important to keep your yoga mat clean. By taking small steps to regularly maintain your mat’s cleanliness, you’ll prevent the buildup of dirty, stinky, and potentially infectious microorganisms. And that’s a good reason to relax and breathe deep. 

By Laura Newcomer

Laura Newcomer is a writer, editor, and educator with several years of experience working in the health and wellness space. Formerly Senior Editor at the health site Greatist, Laura is now a professional freelance writer and editor based in Pennsylvania. Her writing has been published on Washington Post, TIME Healthland, Greatist, DailyBurn, Lifehacker, and Business Insider, among others.

The original article : https://www.northwestpharmacy.com/healthperch/how-to-keep-your-yoga-mat-clean-and-when-its-time-to-replace-it

How Can Bikram Yoga Flatten Your Stomach?

The belly is a prized area of the body for many men and women. When fat appears for various reasons, people are often led to exercise as a means to get rid of it.

Get A Flat Stomach With Bikram Yoga

Spot reduction of problem areas doesn’t exist; if you only perform exercises that strengthen certain anatomical areas, you won’t reduce abdominal fat. You need to eat healthy foods and perform regular aerobic exercise to lose all-over body fat. Performing the entire Bikram series will offer the overall health benefits this style of yoga provides with consistent practice, including a toned midsection.

One question that we often get from both new and old students alike is “Where are the abdominals in Bikram yoga?” It’s going to be different for each person and you certainly have to exert the effort and do the proper form to work the core (in any exercise – even crunches!). Regardless of the posture you perform, you should always engage your abdominals. What you’ll find is that Bikram is a nearly 90 minute ab workout!

  • Pranayama: in breathing, the stomach should be sucked in on both the inhale and the exhale; core strength is used to push the air out of the lungs and keeping the stomach in on the inhale helps the lungs work harder to fill, increasing your lung capacity.

  • Half moon: Half Moon pose strengthens all of the core muscles located in the abdomen and the sides of the torso and releases energy from the spine to prepare you for the rest of the Bikram series. Half Moon pose is the first pose of the Bikram series and is particularly beneficial for strengthening the abs. The first part of the pose prepares you for the backbend in the second half, which mimics the gut-busting reverse crunch, one of the top exercises used to tone the belly. With regular practice as part of a whole-body workout, expect the Half Moon to tighten your lower abs, waistline, buttocks and thighs.

  • Awkward: four times in this posture (in parts 1 and 3), the dialogue says something to the effect of “suck it in.” When you’re sucking it in that hard and trying to keep a straight spine, you can’t help but do some work in the abdominal muscles!

  • Eagle: twice here the “suck it in” revisits. Right before you sit and at the end of the posture.

  • Standing Head to Knee: another forward bend so definitely suck the stomach in before rounding down to grab your foot. Another benefit – the tighter you suck your stomach in, the easier it feels to tighten up your glute muscles and leg muscles.

  • Standing Bow: opens the diaphragm and lungs to improve circulation. When you properly engage your abs, this ordinarily difficult pose becomes easier; however, it may take several tries before you can balance successfully. When practiced regularly, this pose firms the abdominal walls, helping tone the upper and lower abdominals as part of a full-body workout.

  • Balancing Stick: every single muscle should be contracted in this posture, including the abdominal muscles!

  • Standing Separate Leg Stretching and Standing Separate Leg Head to Knee are both forward bends so suck the stomach to the spine as you go into them and then challenge yourself to keep it held in the whole time. The constant trying to keep it in is a great ab workout.

  • Triangle: trims the waistline as you use your abs and constantly lift from the lower belly.

  • Toe Stand: forward bend! Suck it in!

  • The Situp: need I say more? Ok, keeping the heels on the floor helps the situp work more of the lower abdominals as well

  • Spine Strengthening Postures: We tend to let our bellies relax in most of these and focus on our spine. But a strong spine must be balanced with a strong core. Cobra, Locust, Full-Locust, and Bow are just the poses to tone your entire midsection. And remember that a “tight body is a light body”. The more you tighten your core, the easier it will be to lift off the ground.

  • Half-Tortoise: Oh yah, this is where it’s at. The whole way into and out of this posture, when you’re slowly lowering your body down or slowly bringing it back up with a straight spine, the core muscles should be working HARD.

  • Rabbit: the extra dialogue in this one definitely calls for sucking it in and depressing the abdominal wall (also another forward bend).

  • Separate Leg with Stretching: a forward bend where you curve your spine; sucking the stomach in on this one really helps you get your head closer to your stomach (more compression = more medical benefit!).

  • Spine Twisting: the more you suck your stomach in, the easier it will be to twist.

  • Blowing in Firm: the dialogue clearly states that this one is good for the abdominal muscles. You should even feel a little cramping in the abs as you do this one from using them to quickly blow the air out of the lungs.


10 Reasons to Participate in the BYN 30 Day Challenge

Challenge yourself to complete 30 classes in 30 days or 5 classes a week for 4 weeks.

We know its not easy, but committing to a regular practice is life changing and a challenge may be just the way to jump start your motivation! Signing up for the challenge is easy. Stop by the front desk to register or sign up online at https://bikramyoganairobi.com/byn2019challenge.

If you are a member you can take the challenge for free, top up if you would like to take the Transformation Challenge, or put your membership on hold.  

Once you register, for the Transformation Challenge you will receive weekly clean eating meal plans, support emails, measurement tracking sheets and access to a private Facebook/ WhatsApp group with the BYN staff, teachers and the director Karim. Still not convinced? Well, here are 10 more reasons you should join either challenge!

1.  Be Accountable

When you work with a group, or set a goal “publicly” it helps to keep our eye on the prize.  Let us know what your goals are and we will check in with you as the days go by.

2. Feel the benefits of a regular yoga practice
Use this challenge to jump start a regular practice!  The more you practice the better the results. 1-2x a week is maintenance. 3+ a week you will feel the benefits a lot quicker.  Get stronger, more flexible and reduce stress.  This practice will make you want to take care of your body more.  Because guess what? If you don’t you will feel it on the mat.  And that is okay.  This practice is not about the postures but about how you feel outside of the yoga studio too!

3. Its a great way to get started
Even if you have just started with us you can join this challenge.  Use these next 30 days to commit to the practice.  Dive in.  See what its all about.  Try different times, different teachers, different classes and see how they feel in your body and mind when you practice FREQUENTLY.

4, Create a long term habit
Once you commit to the next month, you very well may realise that you love the way it makes you feel…and why would you want to stop feeling great?!

5. Be a part of a community
You will be working with a group of like-minded people with similar goals in mind.  You will be able to see how everyone else is doing, share your frustrations, celebrate your victories…and hey, a little healthy competition isn’t a bad thing! Can you do this on your own? Of course you can, but your likelihood of success is amplified with just that bit of accountability and group dynamic!

6. Sleep better
You will.

7. Eat better
You will want to because when you don’t, you’ll feel it.

8. Take time for yourself
You deserve to take time for yourself.  And you may be surprised at how much more accomplished and focused you feel the rest of the day.  You know the routine in an airplane: you put your oxygen mask on first before you help others! Same in life.  Self care so you can be a better human in the world!

9. Feel accomplished
You know that great feeling you get when you cross something off your to-do list? There is just something about it! You will feel accomplished every time you get to check off another class that you have completed! You will be inspired by your own discipline.

10. Be a part of something bigger
People have been practicing yoga for a long time.  By practicing yoga you are part of a long lineage of folks who have found that yoga will make you feel energised and gain self knowledge.  It’s time tested.  We know it works. You will too!

For more information on the Challenge see:

https://bikramyoganairobi.com/30-day-yoga-and-transformation-challenge/

If you can you must .png